Table of Contents
| -. | - | - | THE HOME PAGE | ||
| I. | - | - | GETTING STARTED | ||
| I. | A. | - | Get Control of your CURSOR and FOCUS POINT. | ||
| I. | B. | - | How to Move | ||
| I. | C. | - | How to See. | ||
| I. | C. | 1. | The "Me" Cam - Mirror Camera | ||
| I. | C. | 2. | First Person Camera | ||
| I. | C. | 3. | Bird's Eye Camera | ||
| I. | C. | 4. | Third Person Camera | ||
| I. | C. | 5. | Free Cam - Stealth Camera | ||
| I. | D. | - | How to Communicate. | ||
| I. | D. | 1. | Local Chat Splash | ||
| I. | D. | 2. | Master Chat Window (on World Screen) | ||
| I. | D. | 3. | Master Chat Window (Pop Out) | ||
| I. | D. | 4. | InstaChat | ||
| I. | D. | 5. | InstaMoji | ||
| I. | D. | 6. | Talking in Voice | ||
| I. | D. | 7. | Troubleshooting Voice - Chrome | ||
| I. | D. | 8. | Troubleshooting Voice Firefox | ||
| I. | D. | 9. | Troubleshooting Voice - Computer Device Settings | ||
| I. | E. | - | Learn the Bottom Toolbar (Default Settings) | ||
| I. | E. | - | Communication with Friends | ||
| III. | - | - | Avatar and Personal Customization | ||
| III. | A. | - | Avatar Animation | ||
| IV. | - | - | Meeting Essentials | ||
| IV. | A. | - | Slideshow Presentation System | ||
| IV. | B. | - | Chalkboard System | ||
| IV. | D. | - | Video Presentation System | ||
| V. | - | - | ADDITIONAL FEATURES | ||
| VI. | - | - | Get My Own Region | ||
3DWebWorldz Manual
Step by Step Guide
Welcome to the official QUICKSTART MANUAL for 3DWebWorldz. Following these instructions will help you enjoy a great experience! If you need help, let us know. We’ll be happy to give you a helping hand.
If you don’t catch us in world, contact our techs and community on Discord. You can also send us a support ticket.© Copyright 2020 Yvonne DeBandi. All rights reserved.
---THE HOME PAGE
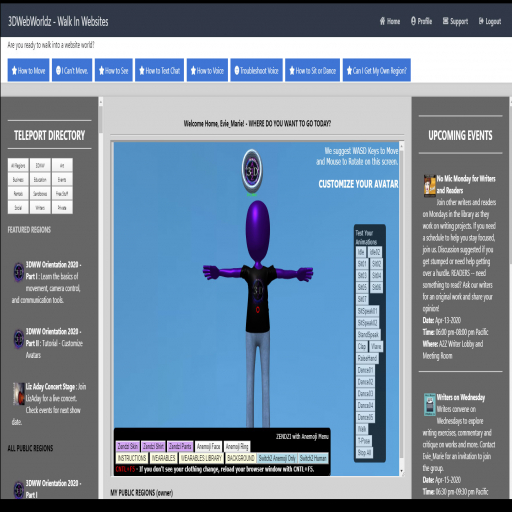
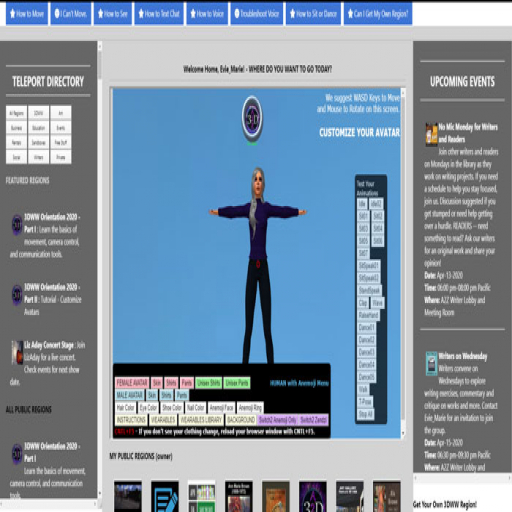
Before we dive in to all the features and functions of 3DWebWorldz, let's take a quick overview of your home page and profile options. This is what you will see after you register and log in: the HOME PAGE.
On the left is the teleport directory.
Make a choice, click and go. Yes, it's that easy... but if it is your first time you may want to read on and follow our tutorial. Understanding how to move, see and hear are key to making your experience of 3DWebWorldz both useful and enjoyable.
In the center you can customize your avatar.
At the present time, your choices are a male or female human, and a genderless fun character we call Zendzis.
On the right you will find upcoming events.
How do you get there? Easy, click the listing and be teleported to the event.
Need Help?
Click the Support Link across the top. Or you can join us on Discord. There you will get news and be able to chat with members when they are offworld.
Profile Settings
Change your password, email and other settings by clicking the profile link across the top.
I. Getting Started
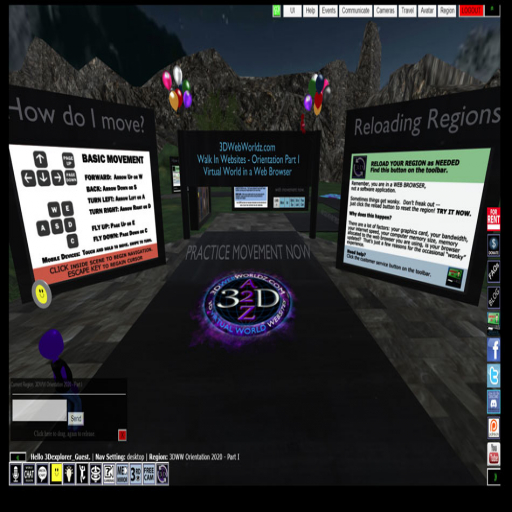
Above is our Orientation Region - Part I (picture taken 1/1/20). We recommend beginning with the orientation regions so you can get your bearings.
The image is provided for reference as you learn features. If you can, split your screen and follow the instruction below as you begin your 3DWebWorldz experience.
I.A. Get Control of your Cursor and Focus Point
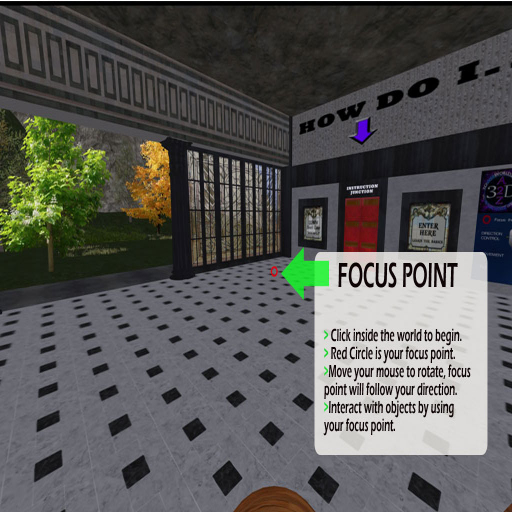
When a 3D web page loads and you move your mouse back and forth, nothing happens until you click inside the 3D space.
(1) Click inside the world to enter Navigation and Interactive Mode.
When you make that inworld click, your cursor will disappear. Now, if you move your mouse back and forth, the red circle (called your focus point) in the center will move.
(2) To get your cursor back, click escape (or your middle mouse button) to exit Navigation and Interactive Mode.
You will need to do this to work with huds, toolbar buttons and panels.
Practice this now. Click in world and move your mouse, watch the red circle move back and forth. Click escape and move your mouse back and forth - the red circle won't move, but you can now click any button on the toolbar.
Sometimes you will need to get your cursor back to work with huds, toolbar buttons and panels.
What is the purpose of the FOCUS POINT -the RED CIRCLE in the middle of your screen? Focusing the red circle on inworld objects will allow you to interact with things. You will learn more about that later, for now, just understand it is like your “inworld cursor”.
I.B. How to Move
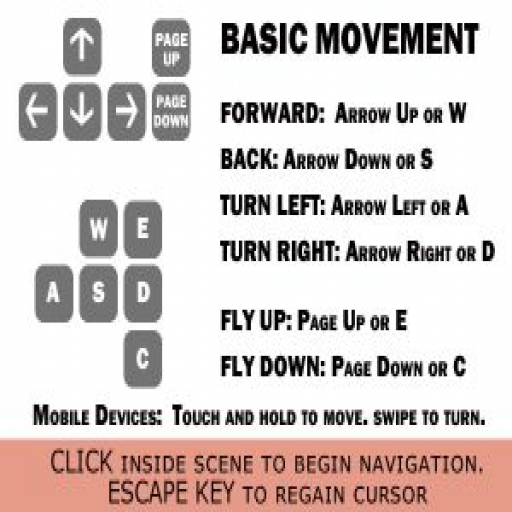
There are several different movement modes in 3DWebWorldz, each movement option is coupled with a camera option.
Let's Start with the Default Setting - 3rd Person Camera with Mouse Look.
Click inside the 3D space to enter navigation mode.
(1) Moving the mouse is like turning your head.
In 3rd Person Camera Mode, you can look around, but it doesn’t move your feet. Try it now, spin your mouse to see the 3D space around you. Return to where you can see your avatar in front of you and remove your hand from the mouse.
(2) Move your avatar a few steps forward by pressing the UP ARROW Key or the W Key.
(3) Move your avatar a few steps backward by pressing the DOWN ARROW KEY or the S Key.
(4) Rotate your avatar right and left by using the LEFT and RIGHT ARROW KEYS or the A and D Keys.
(5) Raise or lower your avatar height by pressing the PAGE UP and PAGE DOWN Keys, or the E and C Keys.
Great job. Let's practice.
Keep your hands OFF of the mouse and walk around the orientation path to practice. Once you get the hang of it, add the mouse back into your journey. You can see a bit more by turning your head when desired.
Remember, in 3rd Person Camera Mode, if you can’t see your avatar walking and you are pressing movement keys, you are not moving the direction your camera is facing. In 3rd Person Camera Mode, the mouse moves your head, not your feet. When you are done practicing, turn around and come back to where you started.
==============================================
TROUBLESHOOTING
I can't move!
A lot of times when users get stuck, they have forgotten about the navigation mode. Click in world to enter navigation mode. If the red circle moves when you move your mouse, you are set to go.
I still can't move!
Check your camera settings. Different cameras offer different movement options -- click the 3rd Eye from the bottom toolbar to put yourself back into default settings and try again.
I still can't move!
 Sometimes computers and graphics cards get stuck. Click the RELOAD WORLD button on the bottom toolbar.
I.C. How to See
In Virtual Worlds the cameras are your eyes, but like a movie set, you have many different angles and options you can call upon.
As discussed in the previous training session, 3rd Person Camera with Mouse Look is the default landing camera. Every time you land on a new region or reload your world, your perspective will revert back to this setting.
There are five camera options, but only three are included with your default bottom toolbar.
Advanced Note: Most get by with the three default cameras just fine, but if you decide to try the others, they can be accessed by the pull down menu "Cameras." Should you decide you like to use the additional cameras on a regular basis, you can add them to your toolbar by customizing your own user interface through the UI button.
I.C.1. The 'Me' Cam - Mirror Camera
This camera button can be found on the bottom toolbar. It is a default setting.
You can also use the top toolbar:
Cameras >> Me Cam - Mirror Camera
What does it do? Rotates the camera 180 degrees to face your avatar. Keyboard movement available in this mode.
I.C.2. First Person Camera
Note: This camera is not a default button. Learn to customize your user interface to add it.
Top Toolbar Access:
Cameras >> First Person
What does it do? This camera provides sight as if through the avatar eyes. You will not see your avatar.
Keyboard movement is available in this mode, but mouse movement is not. As your vision moves, so does your avatar.
I.C.3. Bird's Eye Camera

Note: This camera button is not a default setting of the bottom toolbar. Learn to customize your user interface to add it.
Top Toolbar Access: Cameras >> Birds Eye
What does it do? This camera is above the avatar’s head, first person through the Anemoji character's eyes. This camera mode is recommended for those that choose to use only Anemoji as their avatar.
I.C.4. Third Person Camera

This camera button can be found on the bottom toolbar. It is a default setting.
Top Toolbar Access: Cameras >> 3rd Person with Mouselook
What does it do? This setting puts the camera behind the avatar body. Rotating your mouse turns your avatar head only. If you do not see your avatar moving on the screen, you are not walking the direction you would expect.
This is the default camera setting. If you ever get lost or have trouble moving, we recommend returning to this camera.
I.C.5. Free Cam - Stealth Camera
This camera button can be found on the bottom toolbar. It is a default setting.
Top Toolbar Access: Cameras >> Free Cam
What does it do? This camera mode separates your eyes from your avatar body. As you move your camera, your avatar will remain in the same position.
- To change directon, rotate your mouse.
- To move forward, back, strafe right, strafe left, use your keyboard arrow keys or WASD.
- Your camera will move whichever way your mouse points.
I.D. How to Communicate
The Basics
There are lots of ways to communicate in 3DWebWorldz.com.
This section covers two-way group communication via chat and voice.
Finding friends and personal IMs are covered in Section II. of this manual.
I.D.1. Local Chat Splash
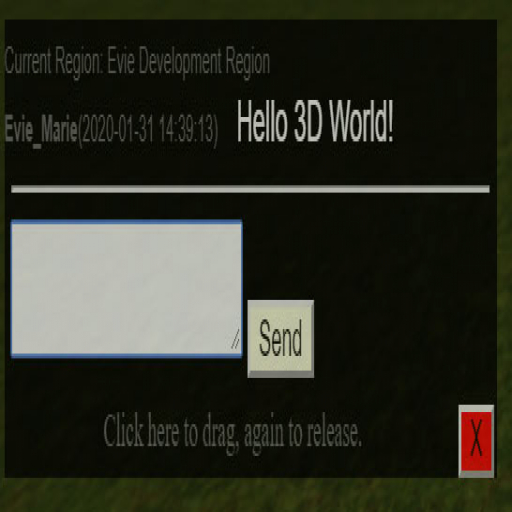
This little box shows up on your screen by default. It is one of many ways you can chat with others on the same region.
Try it for yourself, don’t be shy. If you aren’t sure what to say, just type “Hello 3D World!”
To send the message, click the Send Button or use keystrokes Tab then Enter.
Your chat will appear just above the input box. This little splash shows a limited number of messages, but it is an easy way to get started. More expansive chat tools can be found under the pull down menu Communicate.
Can I remove the Local Chat Splash from my screen?
Yes. Click the UI Button on the top menu bar, uncheck the Local Chat Splash box and save your custom desktop settings. These actions will keep the Local Chat Splash from returning to your screen until you open it again.
If you just want to temporarily close the box, click the red X in the bottom right corner.
I.D.2. Master Chat Window
--On the World Screen
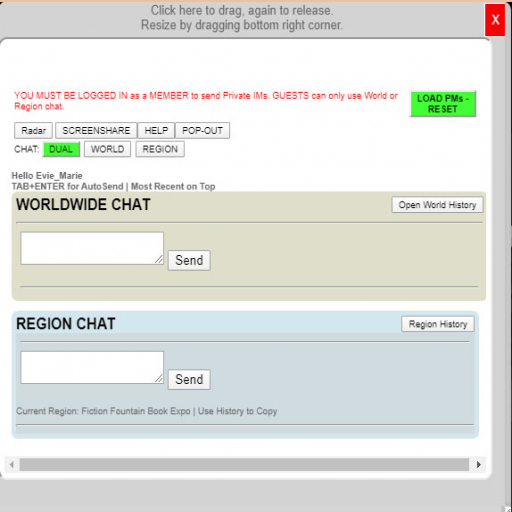
3DWebWorldz offers a few different chat options. You can use "Worldwide Chat" -- where messages are sent out for everyone in the world to see. Or "Region Chat", where messages are seen by anyone standing in the region.
Clicking the CHAT (World/Region) BUTTON from the bottom toolbar.
You can also access this option from the Top Toolbar:
Communicate > Chat - In Window
Type your message into the box and click the send button. Or you can use the keystrokes, Tab + Enter
Check out the buttons across the top. You can adjust what your screen shows by toggling the options on the bottom row.
You can also drag the window across your screen to the most convenient location, as well as resize the window by dragging the bottom right corner.
I.D.3. Master Chat Window
--On a Separate Browser Tab

The POP OUT Chat Window works the same as the master chat window with one exception. Clicking the POP OUT button at the top of the master chat window will open the chat options into a new browser tab.
This allows you to split your screen, keeping all chat options out of the world space.
I.D.4. InstaChat

What is InstaChat?
Instachat is a communication option that puts a literal bubble over the avatar head, with your typed words inside.
How Do I Use It?
This option button can be found on the bottom toolbar. It is a default setting.
Top Toolbar Access Communicate >> InstaChat Bubble
(1) Click the InstaChat button on the bottom toolbar to open the InstaChat hud.
(2) Initiate the InstaChat hud by clicking the submit button.
(3) Type into the hud panel. Use it like a typewriter. Meaning, press enter at the end of the space provided in order to keep your text in the bubble. This is a great way to leave a short message or to help new users find what they need.
Try it for yourself now.
After following the instructions above, click the Me Cam Mirror button in order to see the result!
I.D.5. InstaMoji

What is the InstaMoji?
The InstaMoji is another communication option that adds a bit of fun to the process, but putting an emoji above your head.
Click the button on the bottom toolbar or access from the Top Toolbar:
Communications > InstaMoji
Choose your desired image and click the "Change My Aviface" button.
Besides sharing how you feel, you can let a group leader know you have a question, vote yes or no, and much more.
How do I set the default?
Above every avatar is the Anemoji Character. The default setting for the Anemoji is set in your the customize avatar settings on your home page. Some people use this to display a logo, define an overall personality vibe, or change it on log in to express how their day is going.
I.D.6. Talking in Voice
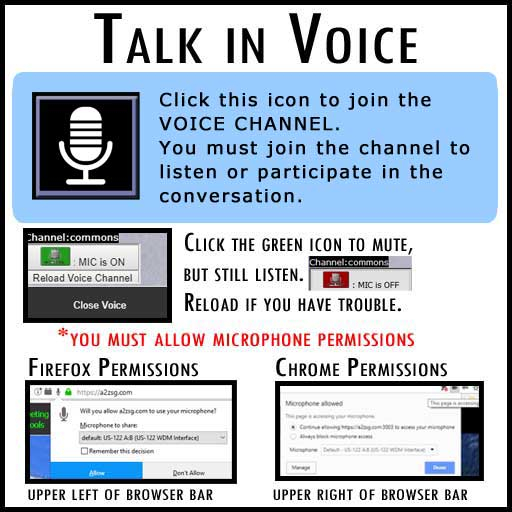
Talking in voice is extremely easy. Click the mic button and talk!
Clicking the mic button will open a hud with three buttons.
1) Top button - mutes and unmutes your voice.
2) Middle button - reloads the voice channel. Sometimes a channel gets out of sync and the voice echoes. Reload the channel to clean up the sound.
3) Close the mic hud to close the voice connection and leave the channel.
**You must open the mic channel to speak or listen.
NOTE: While talking in voice is very easy, sometimes the inital setup can be challenging, depending on your browser security, browser add-ons, computer device settings. Read the trouble-shooting section if you need additional help.
I.D.7. Troubleshooting Voice - Chrome
In order to use voice on any web browser, you must give the browser permission to access your microphone.
Click the microphone button on the bottom toolbar to open the voice hud.
In Google Chrome:
1) Right click the padlock (to the left of the URL web address),

or
2) Right click the camera icon (on the right of the URL browser bar).

Usually the microphone option is evident upon right-click, but if not, click the site setting option. Scroll through the list and look for the microphone permissions.
You MUST accept or allow the microphone permissions to use the voice system.
**I've done that and it is still not working
On the image above, note the microphone pull-down box. Be sure the proper microphone choice has been made.
**People say they can hear me, but I can't hear them.
See the trouble-shooting computer device section below.
NOTE: Browser add-ons and firewalls can also block the voice session. You may need to add a2zsg.com and 3DWebworldz.com to the whitelist.
I.D.8. Troubleshooting Voice Firefox

In order to use voice on any web browser, you must give the browser permission to access your microphone.
In Firefox:
After clicking the microphone button on the bottom toolbar, Firefox will ask you to provide permission. If you miss the pop-up question, you can click on the microphone image at the top of the browser to access the settings.

You MUST accept or allow the microphone permissions to use the voice system.
I.D.9. Troubleshooting Voice - Computer Device Settings
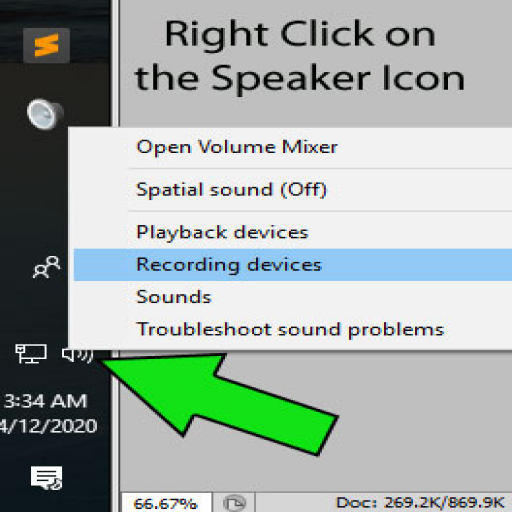
Speaker and Microphone devices are accessed differently on every system, but the general idea is the same. Here is one way to double check your system devices.
1) Right click on the speaker icon and look for the system properties for speakers and microphone. On this system, there is an option for each, as shown on the image.

We recommend disabling the options you are not using to keep the browser from getting confused on which option to use. We recommend the same for the speaker settings.

Troubleshooting your personal voice and device system settings can be frustrating, we get it. But once you get it figured out, it really is as easy as clicking one button! If you need help, don't hestitate to contact support.
I.E. Learn the Bottom Toolbar (Default Settings)
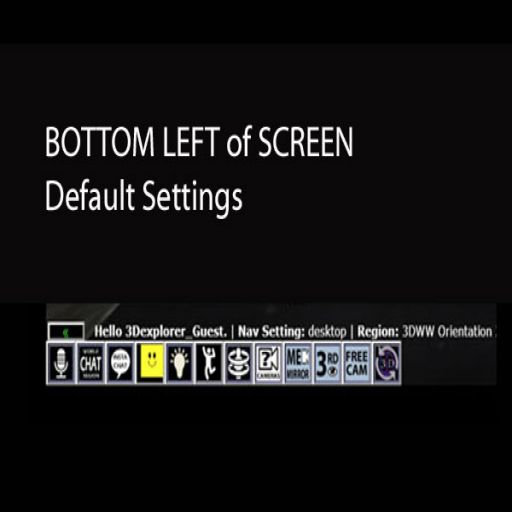
*HUD = Heads Up Display, a panel that opens on your screen providing options / choices.
 |
MINIMIZE TOOLBAR BUTTON Click this button to get the toolbar out your way momentarily. It will reduce it down to one single button. Click that single button to open again. You can set your screen to minimize this toolbar by default through the Top Toolbar Button: UI. Uncheck the Bottom Toolbar on that form and save your changes. Minimizing by default means the toolbar will be reduced to one button on login, teleport and region reload. |
 |
REGION VOICE Top Toolbar Access >> Communicate | VoiceTalk to others in the same region by turning on the voice channel. A mute option is available. We recommend you test the mute function with your browser version and computer set up before you begin having a conversation with your cats. |
 |
CHAT MASTER - World and Region Chat Panel Top Toolbar Access >>Communicate | Chat - In WindowThe Master Chat Panel offers many options. (1) Chat with anyone in 3DWW using World Chat. (2) Chat only with those in your region using the Region Chat. (3) Access Private IMs (Be sure to click the Load PMs to open those in your list) . (4) Access Radar to see who is online. (5) From the Radar Panel you access user profiles and send Private IMs. (6) Access the Screenshare Tool. (7) Access the Chat PopOut option if you prefer to split your screen and use Chat in a separate browser tab.*Note the Chat PopOut Option and the Local Chat Splash are also located under the pull down menu Communicate. |
 |
INSTA-CHAT Top Toolbar Access >>Communicate| InstaChat BubbleThis button will open a small panel in the center of your screen (drag to move). Typing in this space will put a literal bubble over your head. Use it like a typewriter, enter at the end of the space provided to keep your text in the bubble. This is a great way to leave a short message if you are AFK or to help new users find what they need. You can see the InstaChat Bubble above your head by using your Me Cam Mirror View.***Note: If you can not access the text input area, click the send button to initiate the hud. |
 |
INSTA-MOJI EXPRESSIONS Top Toolbar Access >> Avatar | InstaMojiThe AnEmoji character above your head can be used to share instant reactions, or just how you are feeling at the moment.
|
 |
LIGHT HUD Top Toolbar Access >> Avatar | Light HudThis feature allows you to change lighting around your personal space. It will only change lighting on your monitor. No one else will see the change. |
 |
AVATAR ANIMATION HUD Top Toolbar Access >> Avatar | Animation HudOpen the animation hud to access sitting, standing, speaking, dancing and other animations.Click a button to begin an animation. NOTE: Activating an animation automatically puts you in FREE CAM mode, which allows you to move your camera without interrupting your movement. To stop the animation and move your avatar, you will need to activate a different camera.Click a nudge button to reposition your avatar during animation. The directional nudge buttons along the bottom of the animation hud allow you to perfectly position yourself. Each single click of a nudge button will move your avatar a small amount. Continue clicking until you are happy with your location. |
 |
TELEPORT DIRECTORY MENU Top Toolbar Access >> Travel | Teleport Menu Easily transport yourself to regions all over the 3DWebWorldz. Use the category buttons along the top to narrow your search (or choose ALL to see the full list), click the destination button and go!NOTE: If you try to enter a private region that has not provided you access, you will be sent back to Orientation. |
 |
CAMERA INFORMATION AND INSTRUCTION Top Toolbar Access >> Cameras | Cam HelpThis is a help button we provide for new users. Movement can be confusing until you learn how to use your different camera options. If you find yourself struggling to understand how the cameras work, click this button to get a quick and easy guide, or a refresher course. |
 |
MIRROR CAMERA - THE "ME" CAM Top Toolbar Access >> Cameras | Mirror Click to see yourself. Keyboard movement available in this mode. |
 |
3RD PERSON CAMERA WITH MOUSELOOK Top Toolbar Access >> Cameras | 3rd Person with Mouselook Camera is behind the avatar body. Rotating your mouse, turns your avatar head only. If you do not see your avatar moving on the screen, you are not walking the direction you would expect. |
 |
FREE CAM Top Toolbar Access >> Cameras | Free Cam This camera mode separates your eyes from your avatar body. Rotate your mouse to change your direction, keyboard movement available including strafe right and left. Your camera will move whichever way your mouse points. Go stealth! |
| RELOAD YOUR WORLD This button is similar to how the reload page button works in the browser, except that it reloads your 3D world. Builders will use it to see their region changes, fashionistas will use it to see their clothing changes, and everyone may need it on occasion to give their browser a kick. If things get "wonky" for you, try this button first. NOTE: While the button is similar in operation to your browser reload page button, they are NOT interchangeable. If you use the reload page button in your browser you will be logged out. |
II. - - Communication with Friends
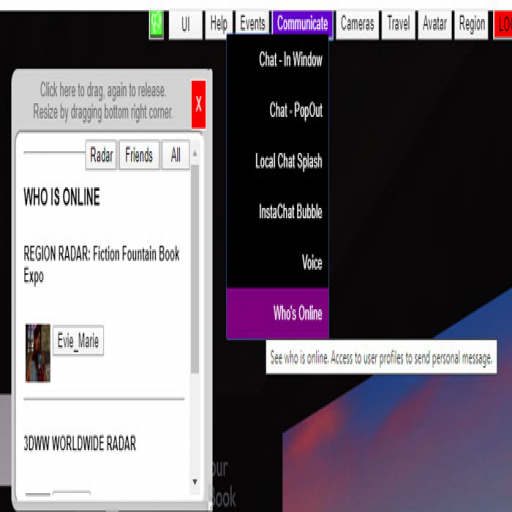
Top Toolbar: Communicate > Who's Online
This option will open up the worldwide radar and provide you with option buttons across the top.
- For those online, you can click the button next to their name to see their profile.
- Friends button > Access the profile for those you have extended/accepted friend requests.
- All > Access all user profiles.
From the profile panel you can send personal messages, extend a friend request, block personal messages from users and more.
When a personal IM is received, a green alert will show in the top left corner.
Access personal IMs from the World/Region Chat Panel
III. - - Avatar and Personal Customization
From the home page, you can customize your avatar. Click the buttons and try it out. We have a library of textures to choose from, or you can upload your own.
Avatar bodies include male and female humans, along with genderless characters we call Zendzi's. You can even shed the body and persist as a floating emoji.
What do you feel like today?
III.A.- Avatar Animation
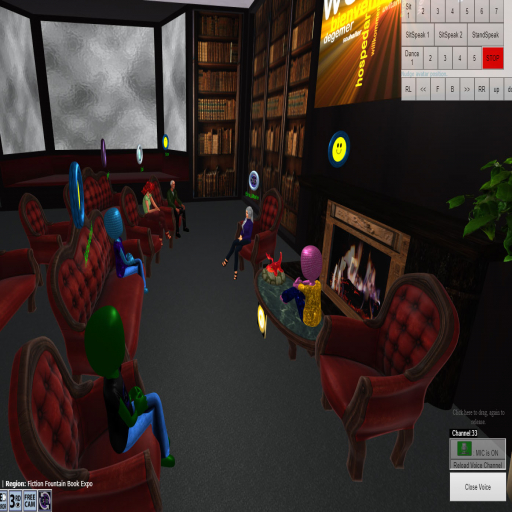
Your avatar will animate idle and walking automatically upon standing still or pressing the movement keys. To perform additional animations, for example, sitting or dancing, you use the Animation Hud.
On the bottom toolbar you will find the Animation Button - as shown in the provided image.
After clicking that button you will see something like this:

HOW TO ANIMATE
- Clicking a button begins an animation.
- Your camera will be automatically shifted to FREE CAM -- so you can freely move your camera without stopping the animation.
- To adjust your position, for example -- sitting on a chair, use the bottom row. The NUDGE BUTTONS will help you get your avatar in just the right spot.
- You can animate anywhere, at anytime. No poseballs or any other clickprims required.
HOW TO STOP ANIMATIONS
- Click the Stop Button on the Hud,
OR
- Change to a movement camera - we suggest 3RD EYE
- CLICK IN WORLD to enter Navigation Mode
- Take a step in any direction to stop the animation.
IV.-- Meeting Essentials
There are lots of tools in 3DWebWorldz to assist with your meetings, along with formal and informal environments.
IV.A.- Slideshow Presentation System
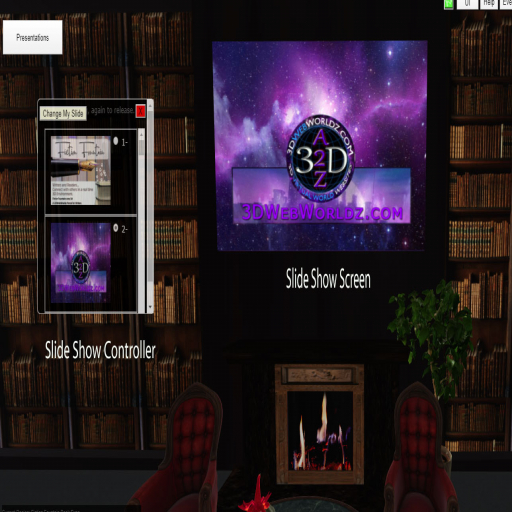
The slideshow presentation and controller can handle up to 50 slides in one presentation.
Updated slideshow instructions will be available soon, but to get you started what this video. It shows the features and function, with a slightly different interface.
IV.B.- Chalkboard System
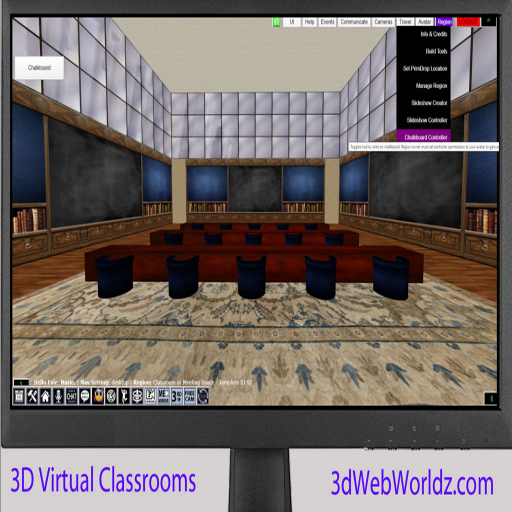

 Don’t worry about your students sitting in the back of the classroom. They can use the FREE CAM tool button on the bottom toolbar to zoom on the chalkboard without leaving their seats.

IV.C.- Video Presentation System
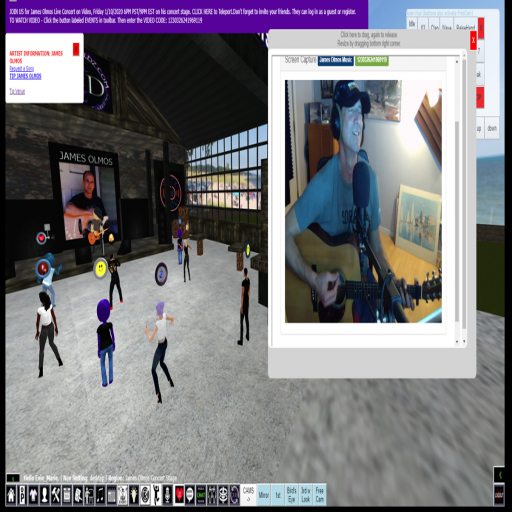
Want to hold a webinar with the presenter on camera? A live music show? A live classroom presentation? A live comedy show?
Using the LIVE EVENT VIDEO SYSTEM in 3DWebWorldz it is not only possible but easy.
Currently, to stream live video you need management approval and will be provided instructions upon scheduling same. Click the support button inside the console to request assistance.
Members of the audience will click:
Top Toolbar > Events > Live Video Event
On the panel that opens:
1) Click Start.
2) Enter the event code provided by the hostess or printed in the World Announcement Section (Top Purple Bar).
Sit back and enjoy!
V.-- Additional Features & Support
There are many additional features and we will continue to work on making this manual a complete step by step document. You can learn to build your own region, hold classes and meetings, and so much more.
In the meantime, if you have a question -- ask us. Sometimes members are surprised to find the feature they desire is just a couple of clicks away.
VI.-- Get My Own Region

Yes, you can get your own region: Click here.
(this link will open a new tab in your browser)
You can build it from scratch. Pull together items from our commons library or use our click and build templates that get you up and running FAST.
Look for our free building classes in the Upcoming Events or contact support for additional help. A 3DWW Building Manual will be available soon.