 3DWebWorldz.com
Building in 3DWW - Uploading Mesh Objects
Creating and Downloading Mesh Objects
3DWebWorldz uses mesh objects in the format of collada (.dae) or GLTF (.gltf).These complex objects can be built in a classic virtual world (like OpenSim.life, our sister world), created from scratch in programs like 3DMesh or Blender, or downloaded from sites like Sketchfab.
There are many tutorials available online for creating these objects. If you are interested in attending a class on building your own objects, please let us know at our HelpDesk by submitting a ticket and expressing your interest. We will respond with upcoming times and dates!
What NOT to include in your Mesh Object
Anything that is fully textured can be included with your object. Things to avoid:1) Items with opacity: For best results with windows and opaque textured items, add those to your structure using Geo-Shape prims.
2) Moving Parts: If you want to have a door that opens, you will need to add that to your structure using Geo-Shape prims or a seprate mesh item.
3) Colors.Colors added using inworld build tools don't always persist on the export/import process. For best results, apply a texture of that color to your build.
.dae or .gltf?
While 3DWebWorldz accepts both file formats, we highly recommend GLTF for faster loading times. Blender can convert your .dae files easily. Import the .dae file and without doing anything to it, export it as .gltf (you must have the .glft export extension enabled).Preparing your Mesh for Upload
3DWebWorldz requires your mesh objects to be zipped (.zip). Make sure your .dae or .gltf main file are in the main layer of the zip file. DO NOT zip up the folder containing all your files. Open the folder so you can see the main .gltf or the .dae file and zip it from there. Your textures, however, may be in a subfolder if that is how your object was created.Uploading Mesh Objects to 3DWebWorldz
We highly recommend you check any downloaded mesh in a program like Blender to make sure your mesh actually works. Some downloaded items are often missing crucial information and files. Please help us keep our server and libraries clean by checking your mesh items first.Uploading Mesh - the Process
Access the Tools
You can only edit textures on a region you own, or a region where you have been given building rights. Click the EDIT TOOLs button on the upper right of your screen to open the edit tools panel.
On the edit panel that opens, click the green button:.
Then click the upload textures button: .
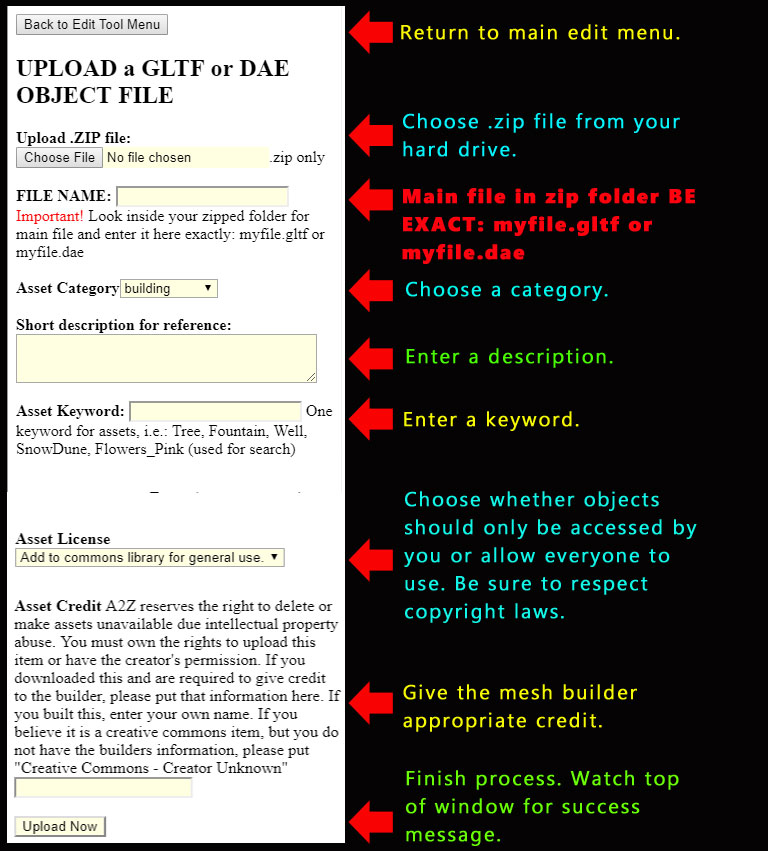
Upload Mesh Panel

Follow the instructions and click the upload button to complete the process.
Need help? Contact us at the A2Z HelpDesk or flag us down in-world.
Have idea on how to improve this tutorial? Or for a new one? Let us know.
Thank you for visiting us and for your support! We look forward to seeing what you build using this brand new technology!
Copyright © 2018 A2Z Smart Group LLC | All rights reserved worldwide. 3DWebWorldz.com